Blog Content
3
Dec
2025
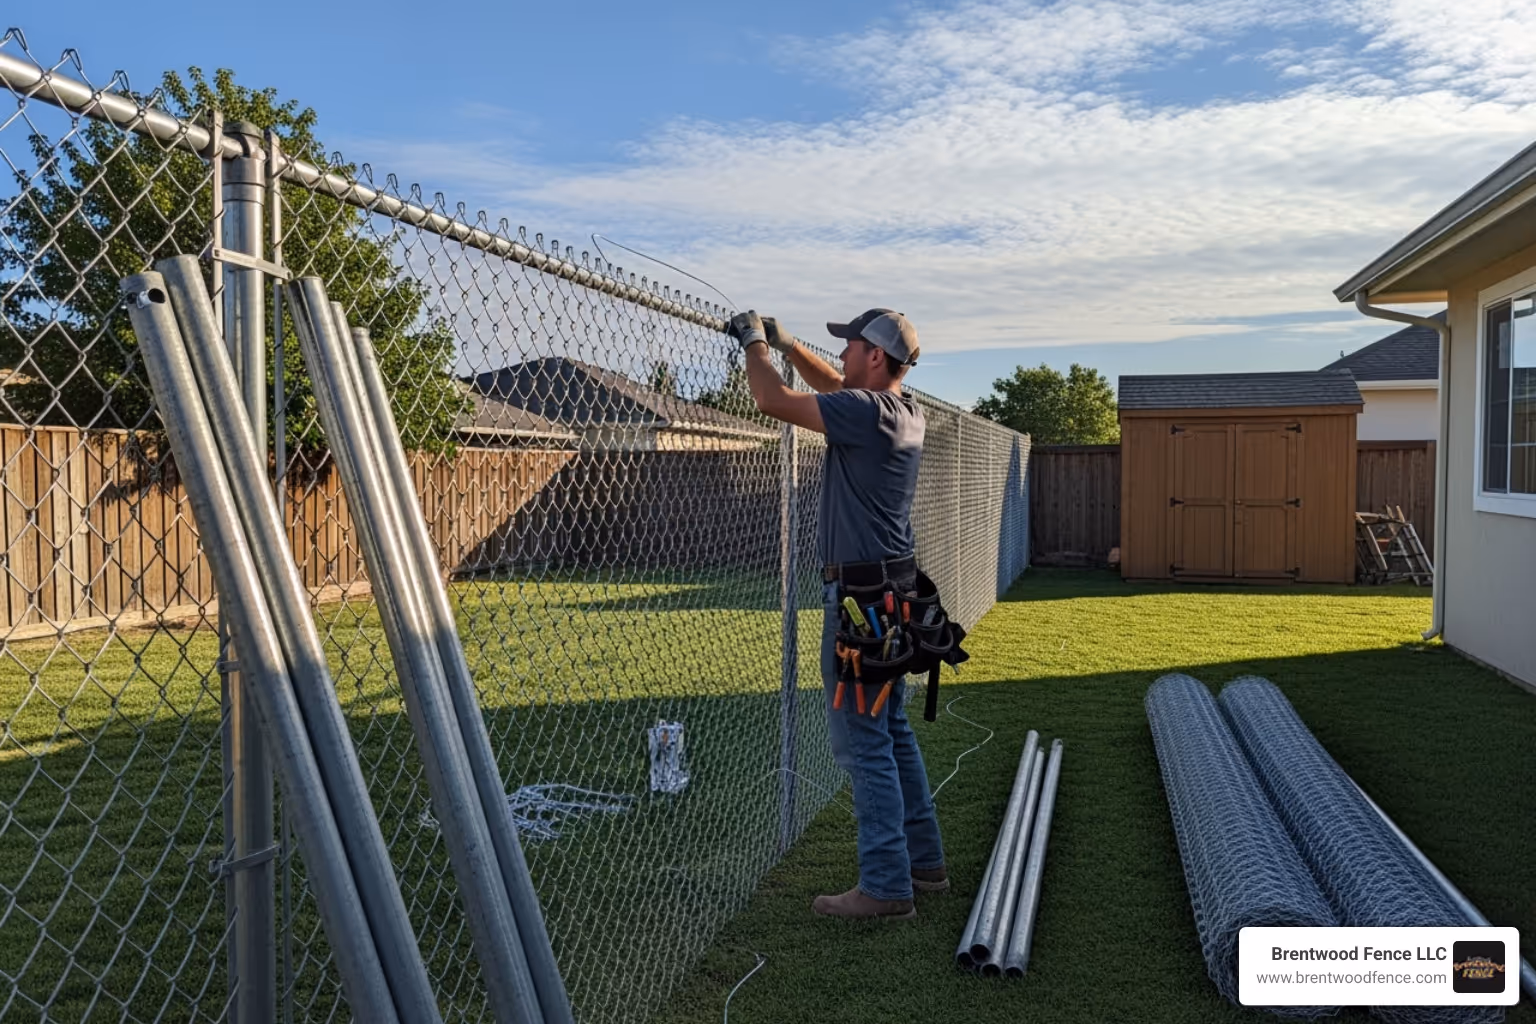
6ft chain link fence installation is a popular choice for homeowners who need a durable, affordable perimeter solution that provides security without blocking sightlines. Whether you're containing pets, securing a pool area, or establishing clear property boundaries, a 6-foot fence offers the perfect balance of height, visibility, and cost-effectiveness.
Quick Answer: Key Steps for 6ft Chain Link Fence Installation
A 6-foot chain link fence differs from shorter fences in several important ways. It requires deeper post footings to handle increased wind load, heavier gauge posts for stability, and five tension bands per terminal post instead of three or four. The installation process demands precision at every step—from digging holes below the frost line to ensuring posts are perfectly plumb and fabric is stretched to the correct tension.
The average cost for installing a 6ft chain link fence ranges from $1,200 to $4,000, depending on fence length, material gauge, number of gates, and additional features like privacy slats.
While many homeowners consider DIY installation, professional fence installation ensures your fence meets local codes, withstands weather conditions, and lasts 15-20 years or more. A poorly installed fence can sag, lean, or fail prematurely—costing more in repairs than hiring professionals from the start.
, brace bands, rail ends, post caps, tension bars, and concrete footings 30 inches deep - 6ft chain link fence installation infographic")
The following sections will walk you through the professional installation process, from essential preparation and material selection to post setting, fabric stretching, and gate installation—giving you the knowledge to understand what a quality installation looks like.
Essential 6ft chain link fence installation terms:
The success of any 6ft chain link fence installation starts long before the first post hole is dug. Think of this phase as laying the foundation for everything that follows—it's where careful planning prevents costly mistakes and ensures your fence will stand strong for decades to come.

Every professional fence project begins with understanding exactly where your property lines are. We carefully verify boundaries and mark post locations approximately 4 inches inside your property line. This small buffer zone is crucial—it keeps concrete footings from creeping onto your neighbor's land and prevents future disputes.
Next comes navigating local building codes and permits. Most municipalities have specific requirements for fence height, setback distances from streets or sidewalks, and even materials. Skipping this step can result in fines or being forced to remove a newly installed fence. We handle the permit process so you don't have to worry about compliance issues down the road.
Before any digging begins, we always call 811 before you dig. This free service locates underground utilities like gas lines, electrical cables, water pipes, and fiber optic lines. Hitting a buried utility line isn't just expensive—it can be dangerous and disruptive to your entire neighborhood.
We also believe in good neighbor relations. Letting adjoining property owners know about your fence plans ahead of time can prevent misunderstandings and keep everyone on friendly terms. Sometimes they'll even share the cost if the fence benefits both properties.
Once the groundwork is handled, we move to the physical layout. We set stakes at all corners and endpoints, then stretch a taut mason's line between them to mark the exact fence perimeter. This string line becomes our guide for a perfectly straight fence run.
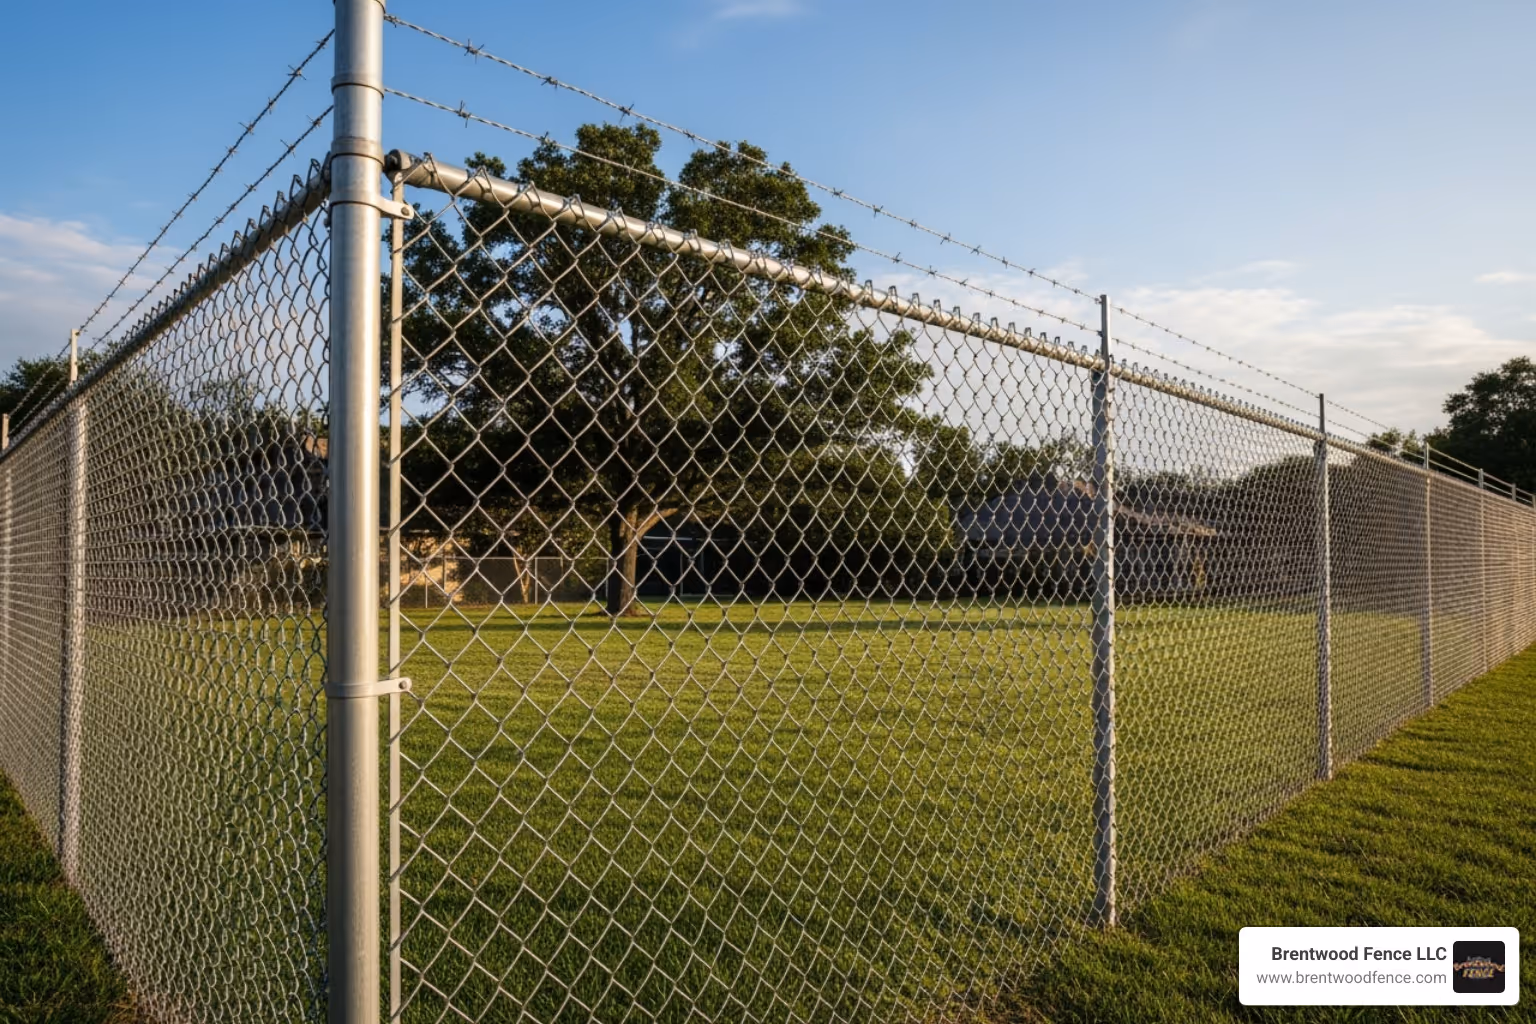
Terminal posts go at every corner, end, and gate location. These are the workhorses of your fence system, bearing the most stress. Line posts are then marked along straight runs, typically spaced no more than 10 feet apart. For a 6-foot fence—especially one that will carry privacy slats—we sometimes recommend tighter spacing of 6 to 8 feet to handle the increased wind load.
To ensure corners are perfectly square, we use the 3-4-5 triangle method. Measure 3 feet along one fence line, 4 feet along the perpendicular line, and if the diagonal between those points is exactly 5 feet, you've got a perfect 90-degree angle. It's simple geometry that prevents crooked corners.
A 6ft chain link fence installation demands quality materials from top to bottom. Cut corners on materials, and you'll pay for it with a fence that sags, rusts, or fails prematurely.
Your 6ft chain link fabric is the heart of the system. We select the appropriate gauge and coating—whether galvanized or vinyl-coated—based on your needs and budget. Heavier gauge fabric costs more but lasts longer and resists damage better.
8ft terminal posts anchor corners, ends, and gates. They're heavier duty than line posts because they bear all the tension from stretched fabric. The extra length allows us to sink them deep enough to resist frost heave and lateral forces. 8ft line posts support the fabric along straight runs, also needing that extra length for proper depth.
The top rail (usually 1 3/8" or 1 5/8" outer diameter) runs horizontally across the top, providing structural integrity and a finished appearance. For a 6-foot fence, we use five tension bands per terminal post—more than shorter fences require—because the taller fabric exerts greater force. Brace bands connect the top rail to terminal posts, while rail ends cap the brace bands to hold the top rail securely.
Post caps protect every post top from rain and snow. Tension bars are woven vertically into the fabric ends and secured by tension bands to terminal posts. Fence ties attach the fabric to the top rail and line posts at regular intervals. Every post gets set in concrete mix, with a layer of gravel at the hole bottom for drainage.
For a deeper dive into material selection and quality grades, visit our guide on Chain Link Fence Materials NH, MA, ME.
Professional tools make all the difference in installation quality and efficiency. A power auger digs consistent, properly sized holes much faster than manual digging—crucial when you're setting a dozen or more posts. A level ensures every post stands perfectly plumb, preventing lean and sag. A fence stretcher or come-along winch applies the consistent tension needed to make fabric taut without over-stressing it. Round out the toolkit with measuring tapes, string lines, wrenches, pliers, and wire cutters, and you're ready for a professional-grade installation.
With preparation complete and materials on hand, we move to the heart of the 6ft chain link fence installation: the physical construction. This is where experience and precision truly matter. Every measurement, every level check, every concrete pour contributes to a fence that will stand strong for decades.

We've installed hundreds of chain link fences throughout New Hampshire, Massachusetts, and Maine, and we can tell you this: the difference between a fence that sags after two years and one that stays taut for twenty comes down to how well this phase is executed. There's no cutting corners here.
Think of post holes as the foundation of a house—except instead of supporting walls and a roof, they're anchoring your entire fence against wind, weather, and time. For a 6ft chain link fence installation, these footings work harder than you might imagine.
We dig terminal post holes to a minimum depth of 30 inches, though we often go deeper depending on your property's frost line. In our New England climate, frost heave is a real concern. When water freezes in the soil, it expands and can literally push posts out of the ground over winter. That's why we always dig below the frost line—typically 36 to 48 inches in our area—to anchor posts in stable, unfrozen earth.
Terminal post holes are usually 8 inches in diameter, roughly three times the width of the post itself. Line post holes are slightly smaller at 6 inches in diameter and 18 to 24 inches deep. We create a bell shape by widening the bottom of each hole, which gives the concrete footing something to grip onto.
Before any concrete goes in, we add about 4 inches of gravel to the bottom of each hole. This simple step provides drainage, preventing water from pooling around the post base where it could eventually cause rust or weaken the concrete. The concrete mix we use has a consistency like thick oatmeal—not soupy, not crumbly. Too much water weakens the concrete, while too little makes it impossible to work with and leaves air pockets that compromise strength.
Here's where the magic of geometry comes into play. Terminal posts for a 6ft fence are set so they stand approximately 6 feet 2 inches above ground—that's the fabric height plus 2 inches. Line posts, on the other hand, are set 2 inches lower than the fabric height, resulting in an above-ground height of about 5 feet 10 inches.
Why the difference? This height variation creates the perfect framework for fabric tension and ensures your top rail sits exactly where it should. When the fabric is stretched tight and the top rail is in place, everything aligns beautifully.
We place each post in its hole and check it with a carpenter's level in two directions—north to south and east to west. A post that's even slightly off plumb will throw off the entire fence line. We often use temporary bracing—wooden stakes and screws—to hold posts perfectly vertical while we pour the concrete.
Once the concrete is poured, we carefully trowel the top surface into a crown that slopes away from the post on all sides. This isn't just for looks. That gentle slope directs rainwater and snowmelt away from the post base, preventing the pooling that can eventually lead to rust and deterioration.
Then comes the hardest part: waiting. Concrete needs two to three days to cure properly before we can continue. We know you're eager to see your finished fence, but this patience pays off with decades of stability. For more information about the robust materials that make this possible, check out our guide on Heavy Chain Link Fencing NH, MA, ME.
Once the concrete has fully cured and your posts are rock-solid, we begin building the framework that will support the chain link fabric. This step is all about precision and attention to detail.
We start by sliding five tension bands onto each terminal post, evenly spaced from top to bottom. These bands have a flat surface that always faces outward—that's where the tension bar will eventually attach. Next come the brace bands, which sit near the top of each terminal post. We cap each terminal post and attach rail ends over the brace bands using carriage bolts with the threaded ends facing inward for security.
For line posts, we drive looped line caps onto the top of each post. These caps have a distinctive offset design—the round side faces outward so the top rail sits flush with the outside face of the fence. This creates a clean, professional appearance.
Threading the top rail through those line caps is like stringing beads on a necklace, except each "bead" weighs several pounds and the "string" is a rigid steel pipe. Sections of top rail connect using swedged ends—one end of each rail section is slightly tapered so it slides snugly into the next section. We measure carefully and cut the rail to fit precisely between terminal posts, ensuring a tight, secure framework.
This careful assembly creates the rigid structure that gives chain link fencing its distinctive strength and durability. For more insights into professional installation techniques, visit our page on Metal Chain Link Fence Install NH, MA, ME.
This is the moment when your fence truly comes to life. Proper fabric stretching separates professional fence installations from amateur attempts—it's the difference between a taut, secure fence and one that sags and looks tired after just a few months.

We start by unrolling the 6ft chain link fabric along the outside of your fence line, carefully working out any kinks or twists. At the first terminal post, we thread a tension bar vertically through the very last row of diamond-shaped links. This bar then attaches to the terminal post using those tension bands we installed earlier, with carriage bolts facing inward.
Next, we loosely hang the fabric on the top rail with a few temporary ties and walk the fence line, gently pulling out obvious slack. Now comes the specialized equipment. For longer runs, we use a come-along winch; for shorter sections, a pul-jak does the job. We insert a temporary tension bar into the mesh about 3 feet from the next terminal post and attach our stretching tool.
Then we crank. Slowly and steadily, the fabric tightens. But how do we know when it's right? Here's the professional test: when you squeeze the mesh loops together with one hand, they should barely move—no more than a quarter inch, and ideally they'll be too tight to squeeze at all. This is the sweet spot where the fence is taut enough to resist sagging but not so tight that it stresses the framework.
If there's excess fabric at the end, we don't just bunch it up. Instead, we carefully remove an entire vertical strand by opening the loops at top and bottom and unwinding it like unscrewing a giant spring. This gives us a perfect fit. We then weave a permanent tension bar into the end of the fabric and secure it to the terminal post with the remaining tension bands.
The final step is tying off the fabric permanently. We use tie wires every 24 inches along the top rail and every 12 to 16 inches along each line post. It's tedious work, but these ties are what keep your fabric firmly attached through years of wind, weather, and the occasional impact from a soccer ball or energetic dog.
This careful stretching and securing process is what gives a professionally installed chain link fence its characteristic tautness and longevity—a fence that looks as good in year fifteen as it did on installation day.
With the main fence structure and fabric in place, our professional 6ft chain link fence installation nears completion. The final steps involve installing gates, adding finishing touches, and ensuring all components contribute to the fence's overall security and longevity.
Gates are essential access points and require careful installation to operate smoothly and securely. We pay close attention to every detail of gate hardware and placement.
For hinges, we use heavy-duty male and female components. The male hinges are bolted to the gate post, and critically, the top hinge is installed upside down. This clever technique prevents the gate from being lifted off its hinges by intruders. The female hinges are then attached to the gate frame, and the gate is hung. We ensure approximately 2 inches of ground clearance, allowing the gate to swing freely without dragging. Adjustments are made to ensure the gate's top aligns perfectly with the fence line and that it has a full, unobstructed swing.
Latches are equally important for security. We install robust fork latches or other secure latching mechanisms, ensuring they operate smoothly and provide reliable closure. For double drive gates, we also install drop rods and center stops to keep both gate leaves aligned and securely closed. The precision in gate installation is a testament to the quality of our Truss Rod Chain Link Fence NH, MA, ME systems.
Installing a 6ft chain link fence presents unique challenges and considerations compared to shorter fence heights, which professionals are well-equipped to handle.
The increased height means greater leverage for wind and other forces, necessitating deeper post footings. As mentioned, we dig holes to a minimum depth of 30 inches, often deeper to get below the frost line. We also typically use heavier gauge posts for 6ft fences to ensure they can withstand these additional stresses.
The wind load on a 6ft fence is significantly higher, especially if you plan to add privacy slats. This can require closer post spacing, sometimes down to 6 or 8 feet, to maintain structural integrity. For taller fences like these, more tension bands are required to properly secure the fabric. A 6ft fence requires five tension bands per terminal post, compared to three for a 4ft fence or four for a 5ft fence. This ensures uniform tension and prevents sagging across the entire height of the fabric. Understanding these differences is key to a durable installation, a topic we often discuss in our insights on Chain Link Fence Heights NH, MA, ME.
The cost of a professional 6ft chain link fence professional installation is influenced by several factors, which we transparently discuss with our clients.

Here's a breakdown of the key factors:
The average cost for a professional 6ft chain link fence installation typically ranges between $1,200 and $4,000. While this might seem higher than a DIY approach, the long-term savings from a correctly installed, durable fence that meets all codes often outweigh the initial investment. A professional installation minimizes the risk of costly repairs, ensures compliance, and provides peace of mind.
When you invest in a professional 6ft chain link fence installation, you're choosing more than just a boundary marker for your property. You're selecting a security solution that combines strength, visibility, and value in a way few other fencing options can match. Throughout this guide, we've walked you through the careful planning, precise execution, and expert techniques that transform posts and fabric into a fence that will serve you faithfully for 15 to 20 years or more.
The difference between a fence that sags and leans within a few years and one that stands straight and strong for decades comes down to the details we've covered: posts dug below the frost line, concrete footings crowned to shed water, fabric stretched to exactly the right tension, and gates hung with security and smooth operation in mind. A 6ft fence, with its increased height and wind load, demands even more attention to these details—deeper holes, heavier posts, five tension bands per terminal post instead of three or four.
While it might be tempting to tackle this project yourself, the reality is that professional installation pays for itself over time. A poorly installed fence means costly repairs, potential code violations, and the frustration of dealing with gates that won't close or fabric that sags. When you work with experienced professionals, you gain the peace of mind that comes from knowing every post is plumb, every tension band is properly secured, and every component meets or exceeds local building codes.
At Brentwood Fence LLC, we've built our reputation on delivering exactly this level of quality and care throughout New Hampshire, Massachusetts, and Maine. We understand the unique challenges of our region's weather, from frost heave to heavy snow loads, and we install every fence to withstand them. Your property deserves a fence that improves security, defines boundaries clearly, and adds lasting value—and that's precisely what we deliver.
Ready to get started on your fence project? Contact us for your Chain Link Fencing Installation and let's discuss how we can help protect and define your property with a fence built to last.
Copyright 2022 Brentwood Fence | All Rights Reserved | Sitemap | Website by Plumb Development a Digital Marketing Agency