Blog Content
3
Nov
2025
Wooden privacy fence installation is one of the most effective ways to transform your backyard into a secure, private oasis while boosting your home's curb appeal and value. However, the difference between a fence that lasts decades and one that fails within a few years often comes down to proper installation techniques.
Key stages of professional wooden privacy fence installation:
A well-installed wooden privacy fence provides immediate benefits that go far beyond just marking property boundaries. Privacy becomes instant - no more awkward encounters with neighbors while relaxing in your yard. Security improves as the fence creates a clear barrier that deters intruders and keeps children and pets safely contained. Curb appeal increases significantly, with research showing that wood fencing delivers a solid 62% return on investment.
The installation process itself is labor-intensive and technically demanding. Professional installers typically complete projects in 1-3 days, while DIY attempts often stretch into weeks or months. More importantly, mistakes in post depth, spacing, or concrete setting can lead to fence failure, especially in New Hampshire, Massachusetts, and Maine where frost heave is a real concern.
As one satisfied customer noted: "Kirk and his team provided an estimate, and then completed the installation of a high-quality wood fence within two weeks. Honestly, it was about the best experience one could hope for."
, Stage 2 Preparation (site clearing, post marking, utility checks), Stage 3 Installation (post holes, concrete setting, rail and picket attachment), Stage 4 Finishing (gate installation, staining, final inspection) - wooden privacy fence installation infographic step-infographic-4-steps")
Quick wooden privacy fence installation terms:
Pre-installation planning is the blueprint for a successful wooden privacy fence installation. This crucial phase, which happens long before any digging begins, is what separates a fence that lasts for decades from one that fails within a few years.
The first step is confirming property lines. Fence disputes often start with incorrect placement. Our team uses precise methods to locate property stakes, and we recommend building slightly inside your property lines to prevent future issues.
Next is navigating local regulations. HOA guidelines and local building codes in New Hampshire, Massachusetts, and Maine can be specific about fence height restrictions (usually 6-8 feet), setbacks, and finishes. Permit requirements also vary, and our experienced team handles all the necessary paperwork for you.
Before any digging, we always call before you dig at least two days in advance. This free service marks buried utilities like gas, water, and electrical lines. Hitting a utility line is dangerous and expensive, so we take this step seriously and hand-dig carefully around marked areas.
Neighborly communication isn't legally required, but it's highly recommended. A quick conversation with your neighbors about your fence plans can prevent future disputes and maintain a good relationship.
While DIY installation seems tempting, it often takes weeks or months and mistakes can be costly. Professional installation costs $16-$40 per foot, but it provides expertise, speed, and peace of mind. For a detailed breakdown, see our guide on the cost of wood fence installation.
Choosing a fence style is about balancing function and beauty. Your decision depends on your priorities: complete privacy, airflow, or a mix of both.
Solid board fences offer the most privacy. Pickets are placed side-by-side with no gaps, providing maximum seclusion, wind protection, and noise reduction. It's the ideal choice for creating a true backyard sanctuary.
Shadowbox fences are a popular compromise. Pickets alternate on each side of the rails, creating a "neighbor-friendly" design that looks good from both sides. This style provides strong privacy while allowing for some airflow and light.
Board-on-batten designs feature wider vertical boards with narrow strips covering the gaps. This creates a solid barrier with added visual texture and a classic, rustic charm.
Your aesthetic goals and desired airflow will guide your choice. Our team can help you decide. For more inspiration, browse our privacy fence ideas.
The wood you choose determines your fence's appearance and longevity, especially with the weather in New Hampshire, Massachusetts, and Maine.
Pressure-treated pine is a budget-friendly workhorse. It's chemically treated to resist rot, decay, and insects. While it may have a greenish tint that fades over time, proper sealing or staining ensures solid performance at an affordable price.
Cedar combines natural beauty with durability. Its natural oils resist rot and insects without chemicals. Cedar has a rich color that can be maintained or allowed to weather to a silver-gray. A well-maintained cedar fence can last up to 40 years.
Redwood is another premium choice, sharing cedar's natural resistance to rot and insects. It's known for its rich, reddish color and exceptional durability, though it is often a pricier option.
We'll help you compare the longevity and maintenance needs of each wood type to ensure your choice can withstand New England's tough weather.
To learn more, read our detailed guide on types of wood privacy fences.
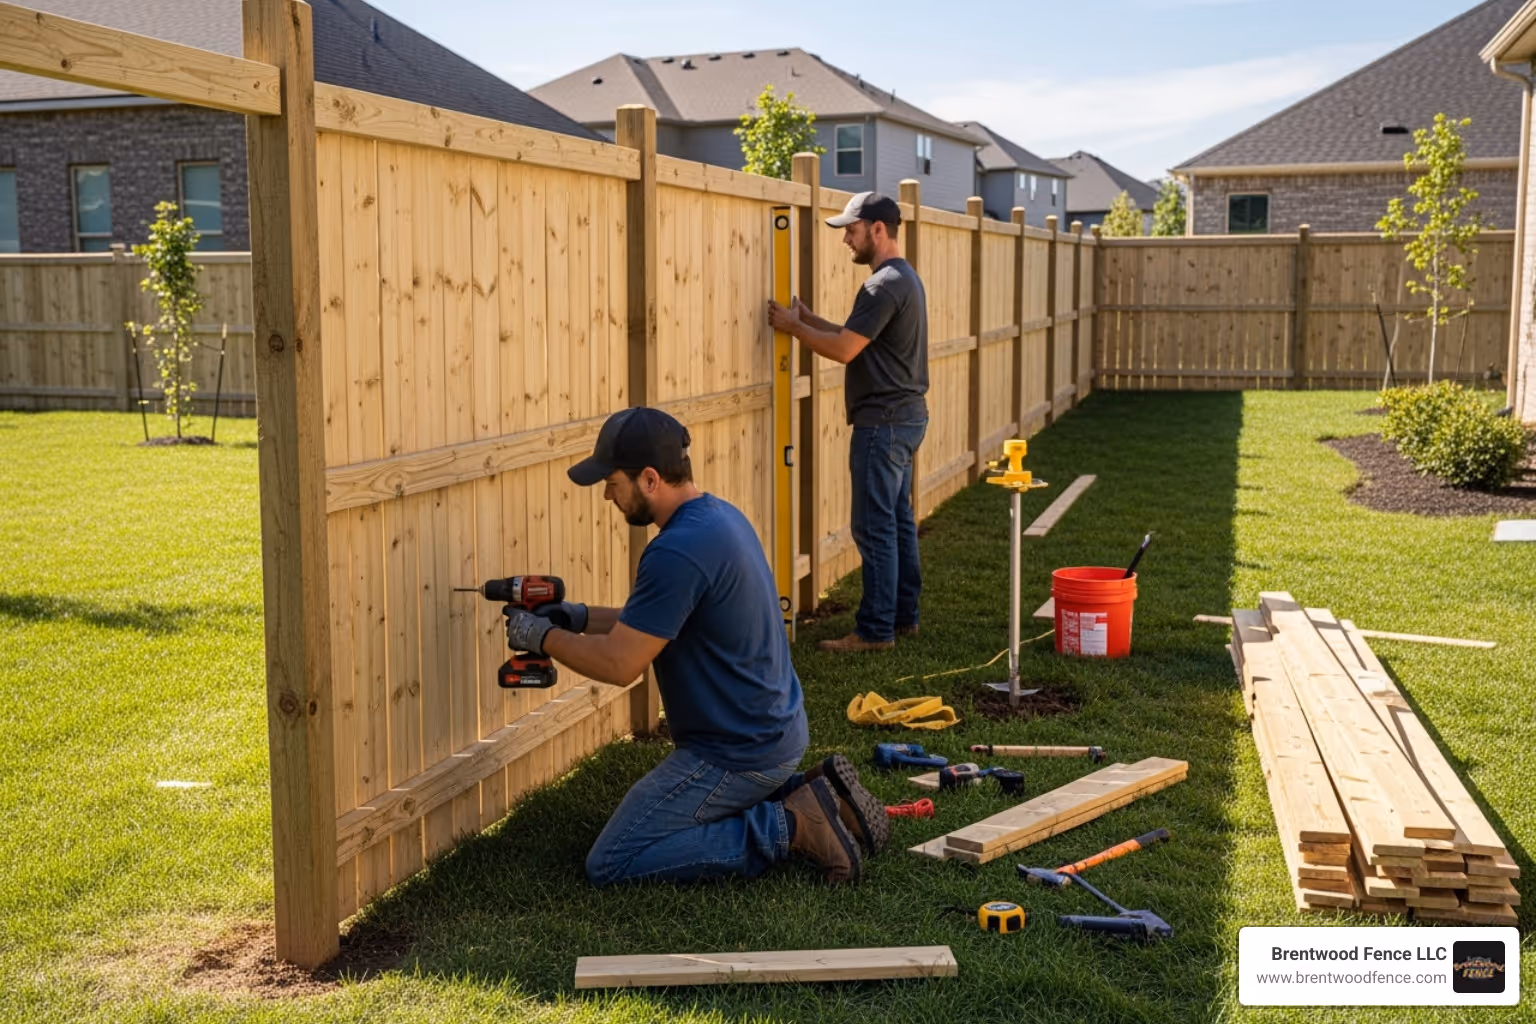
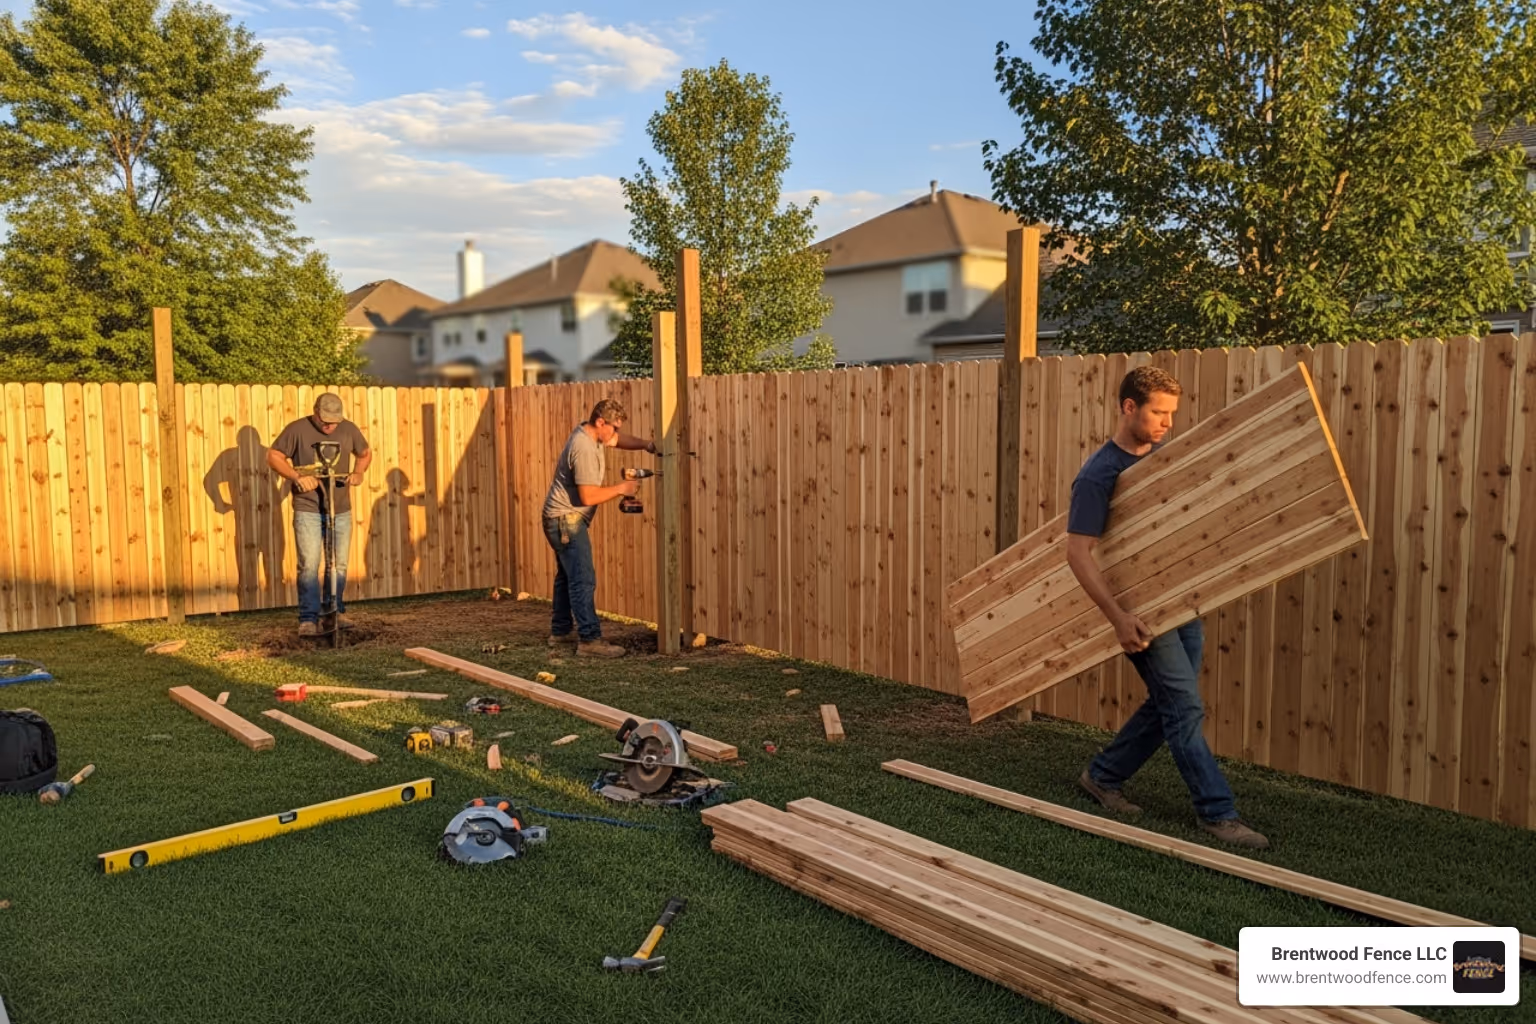
A professional wooden privacy fence installation is a carefully orchestrated process that showcases years of expertise. It requires specialized tools, technical knowledge, and an efficient team. The difference between professional and DIY work is clear: our experienced crews typically complete projects in just 1-3 days, while a DIY attempt can take weeks or months. Professional installation guarantees structural integrity that lasts, avoiding common issues like leaning or sagging that can plague DIY fences. When you invest in your property, you want results that stand the test of time.

First, we prepare the site. The fence line is cleared of debris and vegetation, creating a clean workspace. Then, precision layout begins. We stake the corners and run a taut mason's line for a perfectly straight fence line, using the 3-4-5 triangle method for square corners. Post locations are marked every 6 to 8 feet, with consistent spacing to prevent rail sagging. We carefully account for any slopes or uneven terrain to ensure the fence follows the landscape gracefully or steps down evenly for a professional look.
Expert post setting is the backbone of your fence. For a 6-foot privacy fence, we dig holes at least 2.5 to 3 feet deep, extending below the frost line in New Hampshire, Massachusetts, and Maine to prevent frost heave. A 4-inch gravel base is added for drainage, preventing rot. Holes are dug about three times the post's width to ensure the concrete fully surrounds and supports it. We mix and pour concrete, position each post in the center, and use a post level to ensure it's perfectly plumb. Posts are braced securely while the concrete cures, and we slope the concrete at the base to shed water.
Once the posts are cured, we assemble the framework. For a 6-foot privacy fence, we install three horizontal rails (top, middle, and bottom) for superior strength. We use exterior-grade fasteners and either fence brackets or precise toe-nailing to attach the rails, staggering joints for added integrity. Next, we attach the pickets using screws instead of nails for better holding power—typically six screws per picket. Uniform spacing is key to a professional look, so we use spacer blocks and string lines to ensure every picket is perfectly vertical and level. Pickets are set about 1.5 inches above the ground to prevent moisture damage and prolong the fence's life.

A gate takes more abuse than any other part of a fence, so we build them to last. Gate posts are reinforced with deeper settings or extra concrete to handle the stress of swinging and latching. We use high-quality anti-sag gate hardware kits to prevent one of the most common fence problems. Proper hinge placement and latch alignment ensure the gate swings smoothly and closes securely. Every gate is thoroughly tested and adjusted to ensure perfect operation before we consider the job complete.
Your wooden privacy fence installation is complete, but the journey to a truly lasting fence is just beginning. Think of it like buying a new car – you wouldn't skip the regular oil changes, right? The same principle applies to your fence. With proper care and maintenance, your investment will reward you with decades of beauty, privacy, and security.

The key to fence longevity lies in routine inspection – something as simple as walking your fence line every few months. Look for loose boards, popped nails, or signs of insect damage. Catching small problems early prevents them from becoming expensive headaches later.
Cleaning your fence annually helps maintain its appearance and prevents buildup of mold, mildew, or dirt that can accelerate deterioration. A simple garden hose and mild detergent usually do the trick. For stubborn stains, a soft brush works wonders without damaging the wood.
When you do find damaged boards, replacing them promptly prevents moisture from penetrating deeper into the fence structure. It's like fixing a small leak before it becomes a flood – much easier and cheaper to handle right away.
Don't forget about trimming vegetation around your fence. While those climbing vines might look charming, they can trap moisture against the wood and create perfect hiding spots for insects. Keep plants at least a few inches away from your fence to allow proper air circulation.
Here's where your fence goes from good to great. Applying the right finish is like giving your fence a protective shield against New Hampshire's harsh winters and Maine's humid summers.
Staining versus painting is often the first decision you'll face. Staining penetrates deep into the wood fibers, highlighting that beautiful natural grain while providing excellent UV protection. Paint, on the other hand, creates a thicker protective barrier and offers unlimited color options. Both have their merits – stain feels more natural, while paint gives you that crisp, uniform look.
Sealing the wood with water-repellent finishes is crucial regardless of whether you stain or paint. Think of it as waterproofing your fence. These finishes penetrate the wood and create a barrier that prevents moisture from causing rot and decay.
Here's a pro tip that many DIYers miss: if you have pressure-treated lumber, you need to wait for it to dry completely before applying any finish. Fresh pressure-treated wood is saturated with moisture and chemicals. Trying to stain wet wood is like trying to paint a damp wall – the finish simply won't adhere properly and will peel within months.
The reapplication schedule is straightforward but critical. Plan to refresh your stain or sealant every 2-3 years. Yes, it's an investment in time and money, but it's far less expensive than replacing entire fence sections prematurely. Mark it on your calendar – your future self will thank you.
Let's talk safety for a moment. Pressure-treated lumber is fantastic for outdoor projects because it resists rot and insects, but it does require some basic precautions.
Handling precautions are simple but important. Always wear gloves when working with treated wood – not just for splinters, but because the preservative chemicals can irritate your skin. Eye protection is essential when cutting, and a dust mask prevents you from inhaling sawdust particles.
Proper disposal of scraps and sawdust is more important than you might think. Never toss treated wood scraps in your regular trash or, worse yet, burn them. The chemicals used to preserve the wood can release toxic fumes when burned. Most local transfer stations have specific guidelines for disposing of treated lumber safely.
This is serious stuff – never burn treated wood in your fireplace, wood stove, or backyard fire pit. The chemicals that make the wood rot-resistant become dangerous when released into the air. It's simply not worth the risk to your family's health.
For detailed information about wood preservative chemicals and safe handling practices, the EPA website provides comprehensive guidelines that every homeowner should review.
Taking these precautions isn't complicated, but they're essential for keeping your family safe while enjoying your beautiful new fence for years to come.
When homeowners are considering wooden privacy fence installation, they often have similar questions about the process. We've found that understanding these key details helps our clients feel more confident about their investment and what to expect from professional installation.
The depth of your fence post holes can make or break your entire fence's stability. For a 6-foot privacy fence, we follow the general rule of one-third - meaning the post hole should be about one-third the height of the post that will be above ground. This typically translates to digging holes at least 2.5 to 3 feet deep.
However, here in New Hampshire, Massachusetts, and Maine, there's another critical factor we must consider: the frost line. Mother Nature can be pretty unforgiving during our winters, and when water in the soil freezes and expands, it can actually push fence posts right out of the ground. That's why our team always ensures posts are set with the bottom of the concrete footing below the deepest expected frost penetration.
We also add approximately 4 inches of gravel at the base of each hole. Think of it as a drainage system for your posts - it helps water flow away instead of pooling around the wood, which significantly extends the life of your fence. It's one of those small details that makes a huge difference over time.
This is probably our most common question, and for good reason - the choice between these two styles affects both your privacy and your relationship with your neighbors.
A solid fence features pickets installed tightly together, often overlapping, on one side of the fence rails. It's like building a wall - you get complete privacy with no gaps for prying eyes. This style also blocks wind effectively and can reduce noise from busy streets or neighboring properties. If you're looking to create a true backyard sanctuary, solid fencing is your best bet.
A shadowbox fence takes a different approach entirely. The pickets alternate on opposite sides of the fence rails, creating what we call a "neighbor-friendly" design. While you still get excellent privacy (those alternating pickets block most views), the design allows for better airflow and some light to filter through. Plus, both sides of the fence look equally attractive, which your neighbors will definitely appreciate.
The shadowbox style is particularly popular with homeowners who want privacy without feeling completely closed off from their surroundings. It strikes that perfect balance between seclusion and openness.
This question usually comes up because homeowners are trying to plan around the installation - maybe they're having a backyard party or just want to know when their yard will be back to normal.
Our experienced team typically completes a professional wooden privacy fence installation in 1 to 3 days. That includes everything from the initial site preparation and post setting to the final gate adjustments and cleanup. We're talking about a complete change of your property in less than a week.
Several factors can influence the timeline. Fence length and height are obvious considerations - a longer or taller fence simply requires more work. Terrain challenges like slopes, rocky soil, or tight spaces can add complexity. The number of gates also affects timing since each one requires precise measurements and careful alignment. And of course, weather conditions can sometimes force us to adjust our schedule - we won't compromise quality for speed.
Compare this to a DIY approach, which can easily stretch into weeks or even months for most homeowners. Our specialized equipment, like power augers for digging post holes, combined with years of experience, allows us to work efficiently while maintaining the high standards your fence deserves. Plus, you get to enjoy your new privacy fence instead of spending your weekends struggling with post levels and concrete mixing.
When you step back and look at a beautifully installed wooden privacy fence, it's easy to forget just how much work went into creating that perfect boundary around your home. But as we've explored throughout this guide, wooden privacy fence installation is far more than simply putting up some posts and boards – it's a carefully orchestrated process that transforms your entire outdoor living experience.
The benefits speak for themselves. You gain that precious privacy you've been craving, where you can relax in your backyard without feeling like you're on display. Your home becomes more secure, creating a clear barrier that keeps unwanted visitors out while safely containing children and pets. And let's not forget the immediate boost to your curb appeal – a well-installed fence can provide up to a 62% return on investment, making your home more attractive to future buyers.
The magic is in the details. Proper post setting below the frost line means your fence won't shift with New Hampshire's harsh winters. Precise framework assembly ensures those rails won't sag after a few seasons. Quality wood selection, whether you choose pressure-treated pine for affordability or premium cedar that can last up to 40 years, determines how your fence will age and weather over time.
This is where professional installation truly shines. While a DIY project might seem tempting, the reality is that most homeowners find themselves overwhelmed by the complexity – from navigating permit requirements and utility markings to ensuring posts are perfectly plumb and gates swing smoothly. Our professional team completes in 1-3 days what could take a homeowner weeks or months to accomplish.
At Brentwood Fence LLC, we've seen how the right fence can completely transform a property. We understand the unique challenges of installing fences in New Hampshire, Massachusetts, and Maine – from dealing with rocky soil to working around our region's deep frost line. Our commitment goes beyond just installation; we're here to help you maintain and protect your investment for decades to come.
Your backyard oasis is waiting. Contact us for professional privacy fence installation services and let's turn your vision into reality.

Copyright 2022 Brentwood Fence | All Rights Reserved | Sitemap | Website by Plumb Development a Digital Marketing Agency