Blog Content

7
Jul
2026

Wrapping metal posts with wood is one of the most cost-effective ways to upgrade the look of your porch, fence, or deck — without replacing the structural posts underneath.
Here's a quick overview of how professional installers execute this upgrade:
Wood wraps are decorative sleeves — they don't affect the structural strength of the original post. The metal post continues doing all the heavy lifting. The wood simply gives it a polished, finished appearance.
Material costs typically run $75–$150 per post, compared to $400–$800 to replace a post entirely. A well-built wrap installed by professionals can last 15–25 years with proper maintenance.
Whether you're dealing with aging metal porch columns, plain pipe posts, or basic carport supports, this guide walks you through everything — from wood selection to weatherproofing — so you understand the professional installation process.
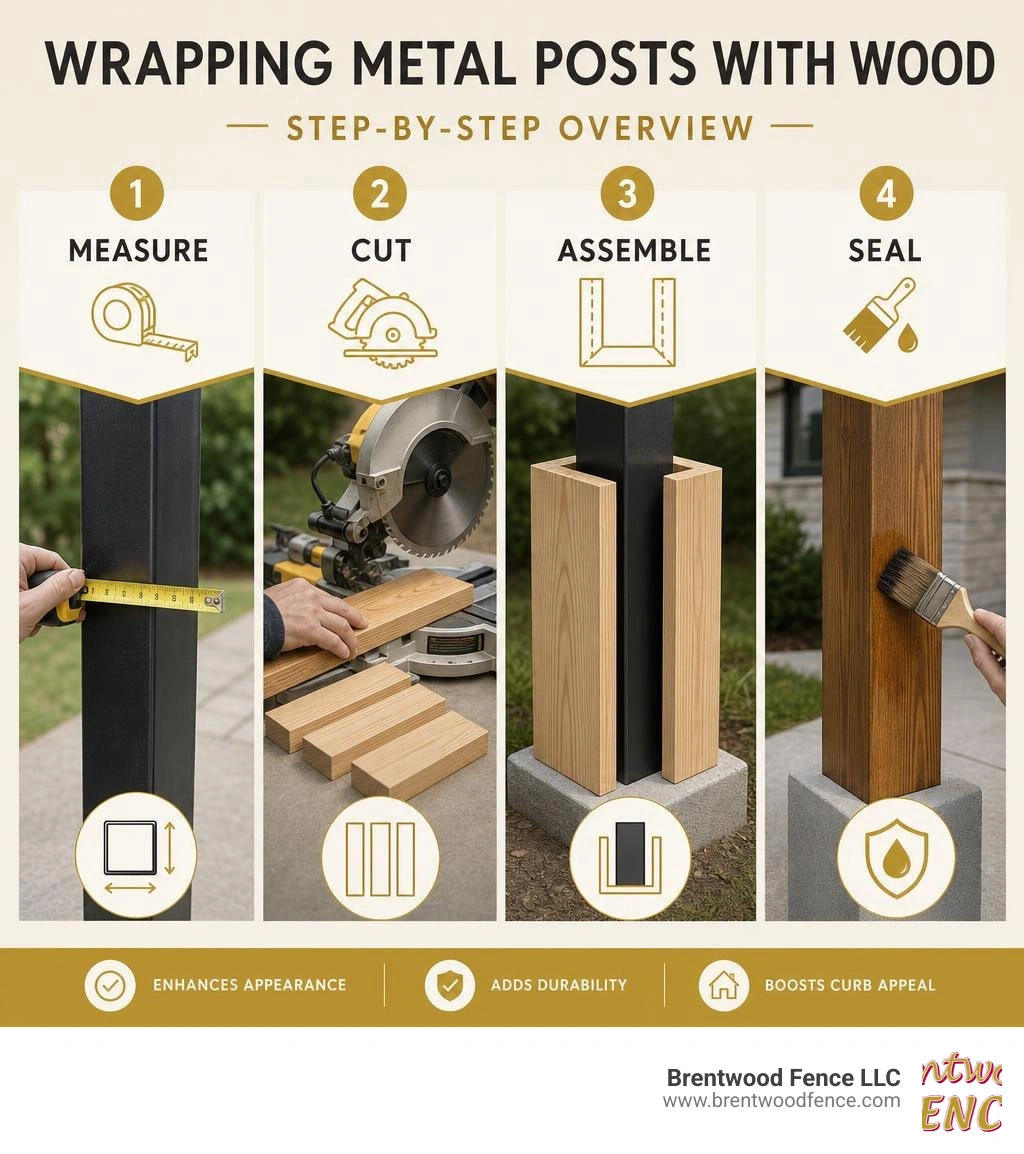
Quick wrapping metal posts with wood terms:
Let’s be completely honest: structural steel and iron posts are engineering marvels, but they often have all the visual warmth of a prison yard. If your front porch or backyard fence is supported by cold, skinny metal pipe posts, it can make your entire home look unfinished. Wrapping these eyesores in rich, natural wood completely changes the architectural narrative.
Beyond the massive boost in curb appeal, wrapping your metal posts with wood offers several key structural and financial advantages:
If you are planning to upgrade your backyard boundary, understanding how these materials interact is crucial. You can explore how we combine these elements in our Guide to metal fence posts for wood fence to see how we blend structural steel strength with beautiful wood aesthetics. For those specifically looking to tackle their front entryway, you can also learn more about the design principles in this guide on How to wrap porch posts with wood.
Choosing the right wood species is the single most important decision you will make for this project. Because these wraps will live outdoors and close to the ground, they must be able to withstand moisture, insects, and temperature swings.
Here are the three most common wood species used for wrapping metal posts:
To help you compare, let's look at how these species stack up:
No matter which wood you choose, we highly recommend acclimating the lumber. Let your boards sit in a dry, covered outdoor area for 7 to 10 days before cutting. This allows the wood's moisture content to stabilize, preventing your beautiful, tight joints from splitting or pulling apart after installation.
For structural fence applications, choosing the right material combinations makes all the difference. Check out our breakdown of Metal fence posts for wood slats to see how professionals design durable, modern wood-and-metal outdoor structures.
Before making your first cut, you must plan for the physical differences between wood and metal. Metal and wood expand and contract at completely different rates when exposed to New England's temperature extremes—from humid July summer days to freezing January nights.
If you build your wood wrap too tight against the metal post, the natural movement of the materials can cause the wood to split, bow, or cup. Always allow a minimum clearance of 1/2 inch around the existing metal post. This air gap provides room for thermal expansion and ensures that moisture doesn't get trapped between the wood and the metal, which could cause premature rot or rust.
Additionally, you need to consider how the wood wrap will be anchored. Because you cannot easily nail directly into a steel pipe post, you will need to use heavy-duty construction adhesive designed for metal-to-wood bonding, or utilize specialized brackets. For fence-line posts, utilizing Wood fence brackets for metal posts is the absolute best way to create a secure, long-lasting connection.
To visualize the structural framing and see these principles in action, check out this helpful visual tutorial on How to wrap your columns the right way.
Achieving a professional-grade finish requires precision, the right tools, and patience. When we wrap posts professionally, we focus heavily on the joinery. While simple butt joints (where one board simply overlaps the edge of another) are easy, they often open up over time as the wood dries.

Instead, professional installers recommend using mitered joints (cutting the long edges at 45-degree angles) or rabbeted joints (cutting a recess along the edge of one board to nest the mating board). These professional joinery methods create a much tighter seal against water infiltration and hide the end grain of the wood, resulting in a seamless, high-end look.
If you are working on a larger property boundary upgrade, you can learn more about how these professional integration techniques apply to full installations in our guide on How to install metal posts wood fence.
To ensure your wood wraps look fantastic and stand the test of time, professional installers follow this precise sequence:
Installers use a wire brush to remove any loose rust, dirt, or peeling paint from the existing metal post. If the metal is bare or showing signs of rust, they apply a coat of rust-inhibiting metal primer before proceeding.
Because you cannot nail directly into the metal post, installers create "cleats" or wood blocking for the wrap to attach to. They cut blocks of pressure-treated 2x4 lumber to fit snugly around the metal post, securing them with a high-quality polyurethane construction adhesive (like Liquid Nails Polyurethane). These framing blocks are spaced every 18 to 24 inches vertically along the post and leveled to ensure they are perfectly plumb.
On a flat work surface, the front board and two side boards are laid out. Installers apply a bead of waterproof exterior wood glue (such as Titebond III) along the joints, bring the three boards together to form a U-shape, and secure them using a brad nailer with 2-inch galvanized brad nails spaced every 6 to 8 inches.
Once the glue has set slightly, the three-sided wood sleeve is carefully slid around the metal post and over the framing cleats to check for plumb and level.
Exterior wood glue is applied to the exposed edges of the U-shaped box. The final back board is placed into position, clamped tightly, and secured to the framing cleats and the mating side boards using a brad nailer.
For more details on managing metal posts in outdoor settings, see our article on Installing wood fence panel metal posts. If you want to see a residential porch transformation from start to finish, check out this comprehensive DIY wood wrapped porch posts guide.
Even the best carpentry will fail within a few years if it isn't properly protected from the elements. Water infiltration is the ultimate enemy of outdoor wood, causing 80% of all wood rot.
To protect your newly wrapped posts, follow these weatherproofing steps:
To keep your wrapped posts looking brand new, perform a quick annual inspection every spring. Check the caulk lines for cracking, look for any signs of peeling paint or finish, and make sure water isn't pooling around the base of the posts. Reapplying a fresh coat of sealant or paint every few years will extend the lifespan of your wraps to 25 years or more.
If you are working with specialized hardware to mount your posts, you can learn more about protecting those connections in our guide on Steel fence post brackets. For creative ideas on matching your wrapped posts to other home features like shutters, dive into this inspiring DIY front porch wood wrapped posts project.
Before planning this project, it is helpful to understand the financial investment. Wrapping your posts is incredibly cost-effective compared to full post replacement, but your total cost will depend on whether you attempt a DIY approach or hire a professional team.
Let's look at a realistic breakdown of the costs:
While a DIY route offers savings on labor, hiring a professional team like ours at Brentwood Fence LLC ensures that your wraps are perfectly plumb, structurally sound, and beautifully finished. Professionals have access to specialized shop tools—like track saws and commercial routers—that produce flawless, seamless miter joints that are incredibly difficult to replicate with basic home workshop tools.
If you are trying to maximize your home's visual appeal on a tight budget, you can find some fantastic inspiration in these DIY wood wrapped porch posts budget ideas.
Yes! In fact, wrapping is the absolute best way to handle load-bearing metal posts. Because the wood wrap acts as a completely independent, decorative sleeve, it does not interfere with the structural integrity or load capacity of the original metal post. The metal continues to support the weight of your porch roof or deck, while the wood simply provides a beautiful exterior package.
A well-constructed wood wrap using high-quality materials (like Western Red Cedar or White Oak) and proper weatherproofing can easily last 15 to 25 years. In coastal areas or regions with harsh winter weather, proper maintenance—such as checking caulk joints and reapplying a protective sealant every few years—is the key to maximizing their lifespan.
Western Red Cedar is widely considered the best wood for wrapping metal posts. It offers an ideal balance of natural rot and insect resistance, excellent dimensional stability (it won't warp or twist as easily as pine), and a gorgeous natural wood grain that looks stunning when stained.
Wrapping your cold, outdated metal posts with warm, natural wood is one of the most rewarding home improvement projects you can undertake. It completely transforms your home's curb appeal, protects your structural supports from the harsh New England weather, and adds real value to your property without the massive expense of a full post replacement.
While a DIY approach can be a fun weekend project, achieving those flawless, seamless joints that withstand the test of time requires precision, specialized tools, and a deep understanding of wood dynamics.
If you want to ensure your home's exterior looks absolutely perfect, we are here to help. At Brentwood Fence LLC, we provide expert craftsmanship and high-end outdoor installations throughout New Hampshire, Massachusetts, and Maine.
Ready to elevate your home's exterior? Explore our Professional Wood Fencing Installation Services or contact us today to discuss your next home upgrade project!
Copyright 2022 Brentwood Fence | All Rights Reserved | Sitemap | Website by Plumb Development a Digital Marketing Agency